
Tips
Detailed Procedures On How To Properly Change A Flat Tyre
Having the knowledge of how to change a flat tyre is very important for every driver. Don’t be surprised to know a lot of car owners don’t know how to bring down their spare tyre talk more of going through the whole routine of changing flat tyre.
Majority of the ladies shy away from doing this. They would rather call a vulcanizer to do it for them. Some guys driving or walking by would even volunteer to help them out. You know why right? Let’s not just delve into that.
Anything can happen anytime and anywhere. What if your car tyre runs flat where you can’t easily get a helping hand? What would you do?
The essence of this write-up is to address this issue. We want you to know how to do it so you would not get stranded. Your safety matters to us.
At the end of this post, you’ll be surprised to find out changing a flat tyre is not even as difficult as it may seem.
Below are the items you’ll need to fix your flat tyre
- Wheel Spanner
- Jack
- Fully inflated spare tire
- Vehicle manual (for the sake of clarity)
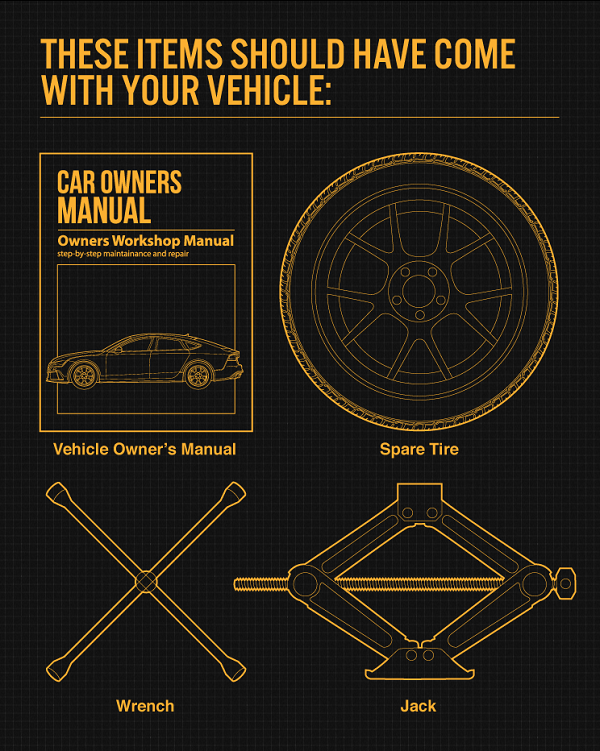
photo credit: bridgestonetire.com
Always ensure you have the first three listed items at all times. If they are not in your vehicle, kindly purchase them.
How to change a flat tyre:
1. Ensure your car is in a safe location:
Please, before you start changing your flat tyre, ensure your safety isn’t compromised. Make sure your car is parked in a very safe location.
A location with flat solid ground is the best.
2. Turn on your hazard light:
Using the hazard lights is very important especially when it is dark. This will help alert other drivers so accidents can be prevented. You can also use your C-Caution.
3. Apply your parking brake:
Once you stop and ready to change the flat tyre, engage the parking brake.
4. Use wheel wedge:
You should be familiar with this. You can always use big stones you see around to act as wedge. It’s always advisable to use two; one to prevent the car from rolling forward, and the other to prevent rolling backwards. If you’re changing a rear tyre, place these in front of the front tyres. If your flat tyre is at the front, put the wheel wedges behind the rear tyres.
-
You may also like: 5 Signs That Indicates You Need Your Tyre Replaced
5. Remove the wheel cover:
This applies if your car is fitted with wheel cover. If you can access the log nuts without removing the wheel cover, you can skip this step.
6. Loosen the lug nuts:
Use your wheel spanner to loosen the lug nuts. This should be done before lifting the car with a jack.
To loosen, turn the wheel spanner in an anticlockwise direction until it slacks. This might require using force to break the resistance.
You should not loosen the nut completely.
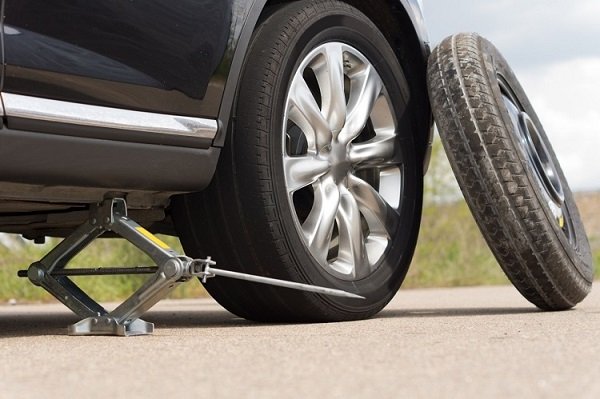
7. Place the jack under the car and jack up:
With the lug nuts slightly loosened, place the jack unto a firm point under the car and then jack up. It’s advised you place the jack beneath the vehicle frame alongside the tyre that’s flat.
You can also follow the instruction in your car manual for jack placement. This is to avoid any form of damage to your car.
Start jacking up after placing the jack correctly.
8. Unscrew the lug nuts completely:
After the car has been jacked and the tyre is above the ground, proceed with loosening the lug nuts completely.
9. Remove the Flat tyre completely from the hub
10. Mount the Spare tyre on the hub:
Push gently until the lug bolts show through the rim.
11. Tighten the Lug Nuts:
Put the lug nuts back on the lug bolts and tighten them. This is not the full tightening. You’ll still tighten when you lower and remove the jack.
12. Lower the vehicle and tighten the lug nuts again:
At this point, you should tighten the lug nuts with the wheel spanner in a clockwise direction. Tighten it as much as you can.
13. Replace the hubcap:
If the hubcap you took from the flat tire will fit your spare, put it in place the same way you removed it initially.
14. Take your flat tyre to a vulcanizer:
The vulcanizer should be able to determine whether your tyre needs a repair or if it’s time to replace it.
We hope this helps.


-

 News1 week ago
Currently, China Has 129 Manufacturers Of Electric And Hybrid Vehicles; The Majority Will Fail
-

 News1 week ago
Lamborghini’s Next Model Will Be A Grand Tourer And Will Not Be Electric
-

 News1 week ago
Hyundai Motor Workers Are On A 3-Day Warning Strike
-
 News1 week ago
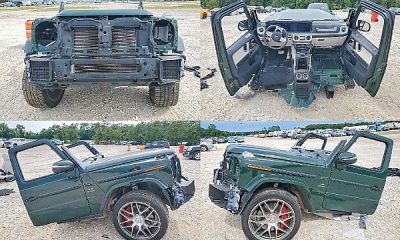
Bidding For This Stripped 2024 Mercedes-AMG G63 With No Rear End Surpasses $18,000 On Copart
-

 News1 week ago
Ferrari Is “Very Happy” With The Luce’s Reactions
-

 News3 days ago
Nissan Finally Discontinuing The Altima Sedan And Says Why
-

 Car Facts6 days ago
What Are The Most Reliable Electric Vehicles?
-

 News3 days ago
For The First Time, Mercedes Is Using A Chinese Engine In A Vehicle Intended For The European Market